

Last week I posted the first in a three-part series about integrating Python with Qlik using Server Side Extensions. In that post, we discussed the architecture and walked through setting up our environment. This blog is going to walk through a very basic example of a Python plugin – a modified version of Tobias Lindulf’s plugin, which was originally published here. The version we will walk through has been trimmed down a bit to focus entirely on the implementation of two custom functions that are callable from within the Qlik Sense front-end. The first function is SumOfRows which takes two columns of data calculates the sum of the elements in each row and returns a single column of the results. The second function is SumOfColumn that sums all the values in a single column and returns a single value. While the functions themselves are trivial, the objective of this post will be to walk you through the important parts of the code and to highlight (in green) what portions of the code you will need to change if you want to create your own (nontrivial) plugin.
You can download all the files that I will discuss in this post from this Git repo. The files we’ll discuss today are in the “Toy Example” directory.
Toy Example Directory
In this directory, we have five main files – excluding the README. The first file is Column_Example.qvf, which is the Qlik Sense application where this custom plugin is used. Copy it to your Desktop/Qlik/Sense/Apps directory to use it from within your Qlik Hub. The four other files make up the main components to the plugin.
ServerSideExtension_pb2.py
logger.config
FuncDefs_ToyExample.json
ExtensionService_ToyExample.py
(the first two of these are fully reusable with no modification – and both are taken directly from Tobias Lindulf’s work – but they are worth mentioning here anyways) We’ll look over these components next.
ServerSideExtension_pb2.py
As mentioned in the last blog post Server Side Extensions use Protocol Buffers to transmit data between Qlik and Python. The folks at Qlik were kind enough to have defined the schema of the data messages once using the protocol buffer language. This ServerSideExtension_pb2.py file is the result of compiling that message schema into Python to generate the serialization/deserialization and access classes. This file basically contains the Python classes that are used to receive and transmit data in the correct form. This file does not need to be altered at all. You can reuse it with any other plugins you want to create as it is.
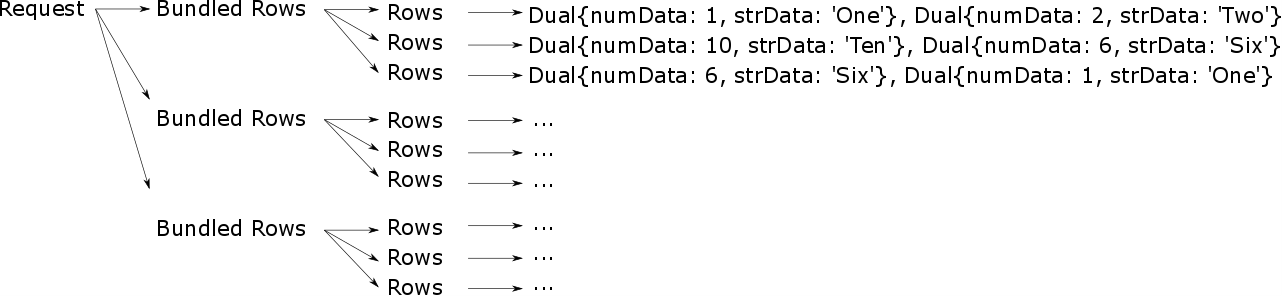
Towards the end of this post, when we talk about how Python receives and sends data to Qlik, it will be important for us to understand how the data is serialized/deserialized as specified in the ServerSideExtension_pb2.py file. The data from Qlik is passed to python in the request, which is an iterator object. The request is made of multiple bundled rows. You can think of a bundle of rows as a smaller portion of the overall data. The RPC framework automatically breaks the data into smaller bundles to avoid trying to send too much data in a single message. Each bundle is comprised of a collection of individual rows. Each row consists of one or more dual values – with the number of values being determined by the number of columns of data being serialized or deserialized. The dual values can consist of a numeric value, string value or both, depending on the parameter type specified in the function definition JSON file (which we will discuss below).
A schematic of how the data are passed from Qlik to Python is shown below.
logger.config
This is a configuration file that allows all interactions with the plugin to be written to the console as well as written to a log file. Two message formats are defined within this file – a simpler format that defines how messages are logged to the console as well as a more complex format that defines how messages are logged to a file on disk. These log files track the usage of the plugin – including which functions were called, when they were called, and any resulting error messages. This config file can be used directly without need for modification as well. Alternatively, if you are of a mind to do so, you can easily modify the message format, though that is outside the scope of this post.
FuncDefs_ToyExample.json
This file is used to define the metadata associated with each custom function that is being deployed in the SSE plugin. This file is used by Qlik to interpret the capabilities of the plugin. Specifically, to run a SSE plugin, you must first run the plugin (service) and then start the Qlik Engine (in that order). When Qlik is started, it makes a single GetCapabilities RPC to the plugin. It is at this point that the Qlik Engine gets the capabilities of the SSE plugin. Those capabilities are defined within this JSON file. You will need to create a similar JSON file if you want to implement your own functions. This is the first file I modify when I begin to code a new SSE plugin.

| "Id" | ExecuteFunction RPC will pass with this ID (along with the data) to the Python SSE plugin. The SSE plugin will then take that request and map this Id to a function defined within the plugin. |
| “Name” | This is the name you will use to call the function from within Qlik. This will be used when calling the function from the Qlik front end. For example: Column.SumOfColumn([Data Field]), where Column is the alias for the plugin in the Settings.ini file that we discussed in Blog Post 1, found here. Internally, Qlik will recognize the function Name and send a RPC with the function Id from above. |
| “Type” | This is the type of function being called. It should be specified as an integer value corresponding to one of the categories below. Qlik currently supports three function types:
Note that for the example Plugin we are talking about today the first function SumOfRow is a tensor (type 2) because it will sum across the rows of multiple (two) columns and return a column of values. SumOfColumn is an aggregation (type 1) because it will sum all the rows of data in a column and return a single value. Tensors can be thought of as functions where multiple values are returned (as in a chart or table) whereas Aggregation functions can be thought of like a KPIs. |
| “ReturnType” | This is the type of data (string, numeric, dual) that will be returned from the plugin to Qlik. It is an integer value representing the type of value that the function will return from Python to Qlik Sense. For the plugin, we are talking about today, both functions return numeric value since they have specified ReturnType as 1.
|
| “Params” | This defines the number and type (string, numeric, dual) of parameters that Qlik will pass to the SSE Plugin. It is a comma separated list (inside of curly braces) of the input parameters and datatypes to the function. This defines the data passing from Qlik to Python. In the examples above, you can see that the SumOfRow function expects two numeric field, whereas SumOfColumn expects a single numeric field.
|
ExtensionService_column.py
This file is the main body of the plugin. There are two primary methods that are implemented here. Note that neither of them need to be modified, but you should be aware of what they do:
| GetCapabilities | The GetCapabilities method is implemented at line 182. When the Qlik Engine Service starts (when you first open Qlik Sense), it issues the GetCapabilities RPC to all ports specified in the Settings.ini file. In response, if a plugin is running on those ports, the capabilities defined within that plugin will be sent back to Qlik Sense using this function. |
| ExecuteFunction | When the Sense front-end passes a SSE function call to the QIX Engine for evaluation, QIX will issue the ExecuteFunction RPC to the plugin. As part of the request header, the Qlik Engine Service includes the function ID – corresponding to which function in the plugin should be evaluated. Within the ExtensionService_column.py, the ExecuteFunction function directs the RPC call to the appropriate function. |
Beyond the two main methods it would be overkill to try to explain every single part of this file, but I’ll try to highlight the main points you are likely to modify, specifically regarding:
- Configuring the Plugin Service
- Defining the plugin Functions
- Implementing Custom Functions Logic
Configuring the Plugin Service
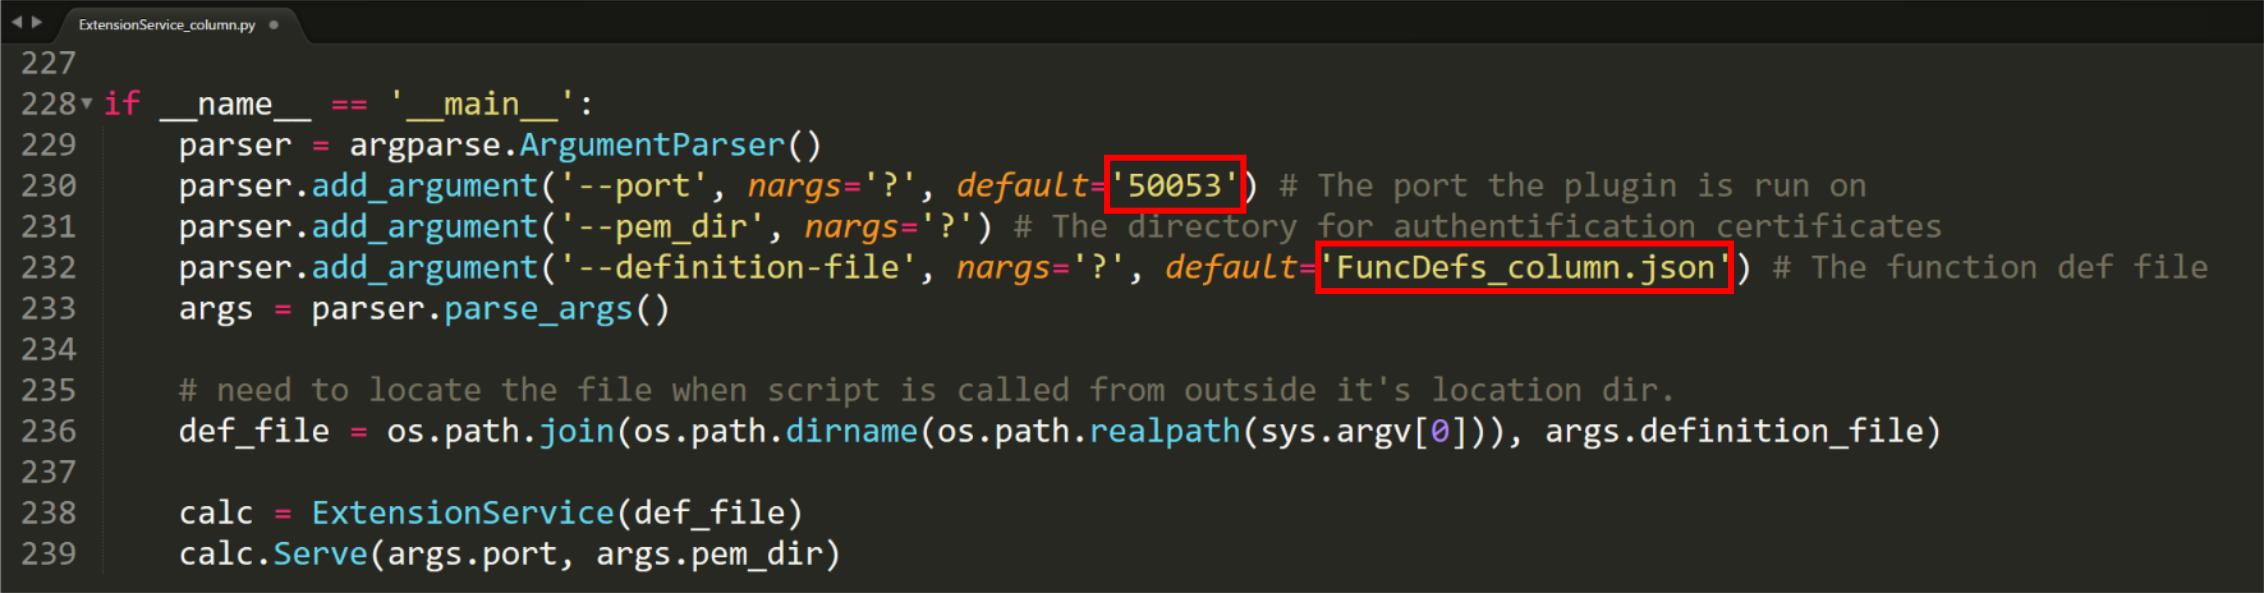
When the ExtensionService_column.py script is running, the code on lines 228 through 239 is executed.
These lines specify some configuration information and then launch the plugin per that configuration. The important parts to be aware of if you want to make your own plugin are the following:
- The port on which the service (SSE plugin) will run is specified on line 230.
If you were to implement your own service, you would need to change the port on which to run the service. Make sure not to run multiple plugins on the same port simultaneously. - The name of the function definitions JSON file (which should be in the same directory as the ExetensionService.py) is specified on line 232.
Change this to specify the location of your Functions Definition JSON file.
If you want to learn more about running a plugin in a secure mode, you can make some changes here to do that as well (it will require some Qlik configuration as well). I suggest you look into Qlik’s documentation, as that is outside the scope of this post.
Defining the Plugin Functions
The function on line 50 of the code, functions returns a python dictionary that maps the function Id from the Functions Definition JSON file to actual functions implemented in the ExtensionService python file. We can see that function Ids 0 and 1 (which corresponded to SumOfRows and SumOfColumn in the Function Definitions JSON) are mapped to internal python functions called _sum_of_rows and _sum_of_column. I want to be clear here. In the Qlik Sense front-end, the functions will be called using Column.SumOfRows and Column.SumOfColumn. When those functions are recognized by the Qlik Engine, Qlik will pass the function Id’s (0 and 1 respectively) in the request header during the ExecuteFunction RPC. This function here will ensure that the functions _sum_of_rows and _sum_of_column are being executed.
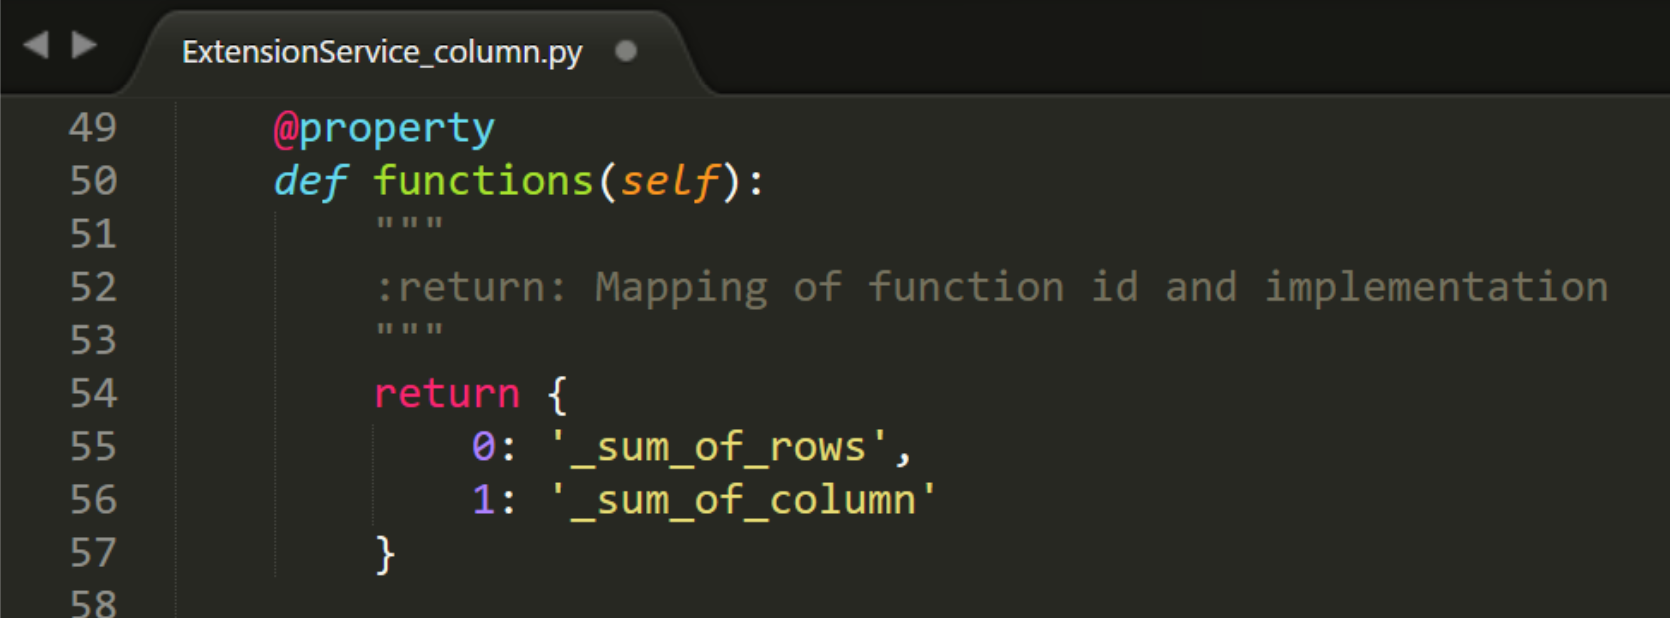
If you have added to, modified, or created your own Functions Definitions JSON file, you need to make sure that the IDs you used in that file match the numeric values in this dictionary. Furthermore, you need to make sure that they map to the appropriate internal function names as well.
Implementing Custom Functions
The actual implementations of the custom functions for the Toy Example are on lines 64 and 93. It is important to note that these function names match the ones defined on lines 55 and 56. Below we can see the implementation of the custom _sum_of_rows function.
Implementation Details
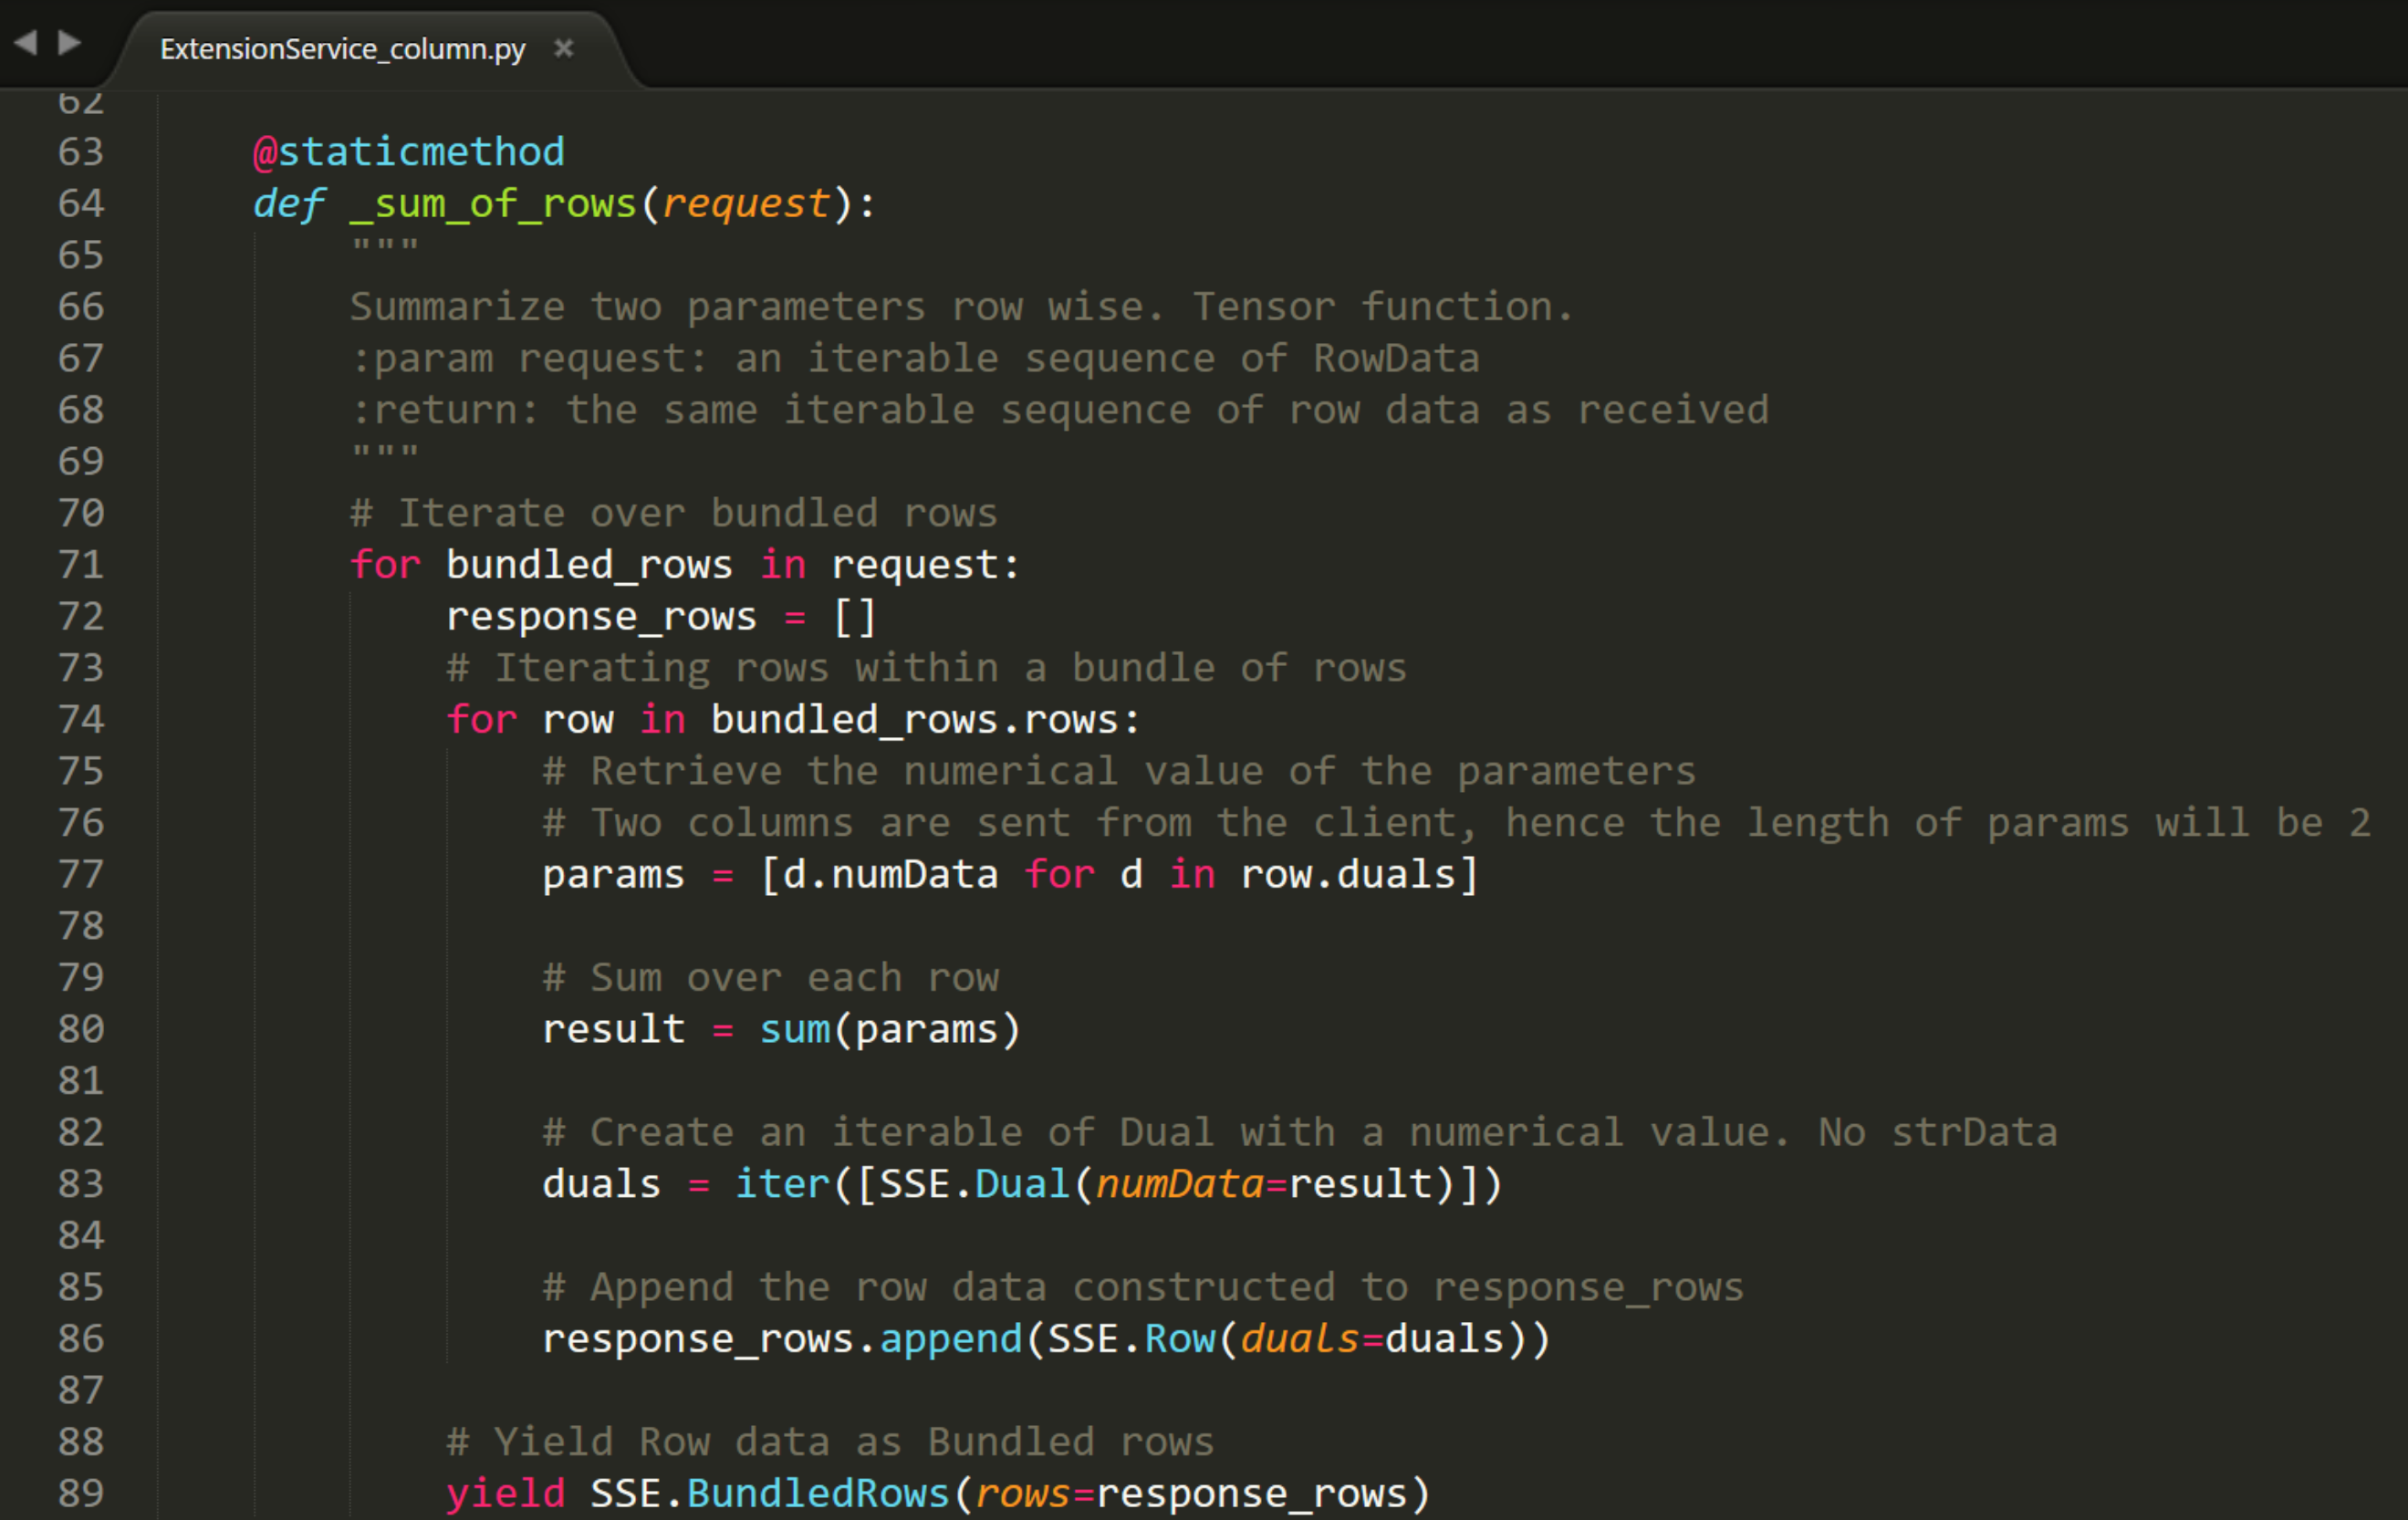
As mentioned earlier, it is important to know how to expect the data being sent in the request from Qlik to Python. We already discussed the concept of of bundled_rows, rows, and duals above. The code snippet below explicitly shows the portion of _sum_of_rows function responsible for collecting and manipulating the data as it comes in from Qlik Sense.

What the chunk of code does is to look first at each bundle of rows. Then it initializes a blank list to store the calculation results. Next, it iterates over each row within a bundle. Within each row, the numeric values (there will be 2) are collected using Python list comprehension and stored into an object called params.
To serialize the data back from python to Qlik, you must build the structure in reverse. In the code snippet below, you can see how the data are being collected to be sent back to Qlik.
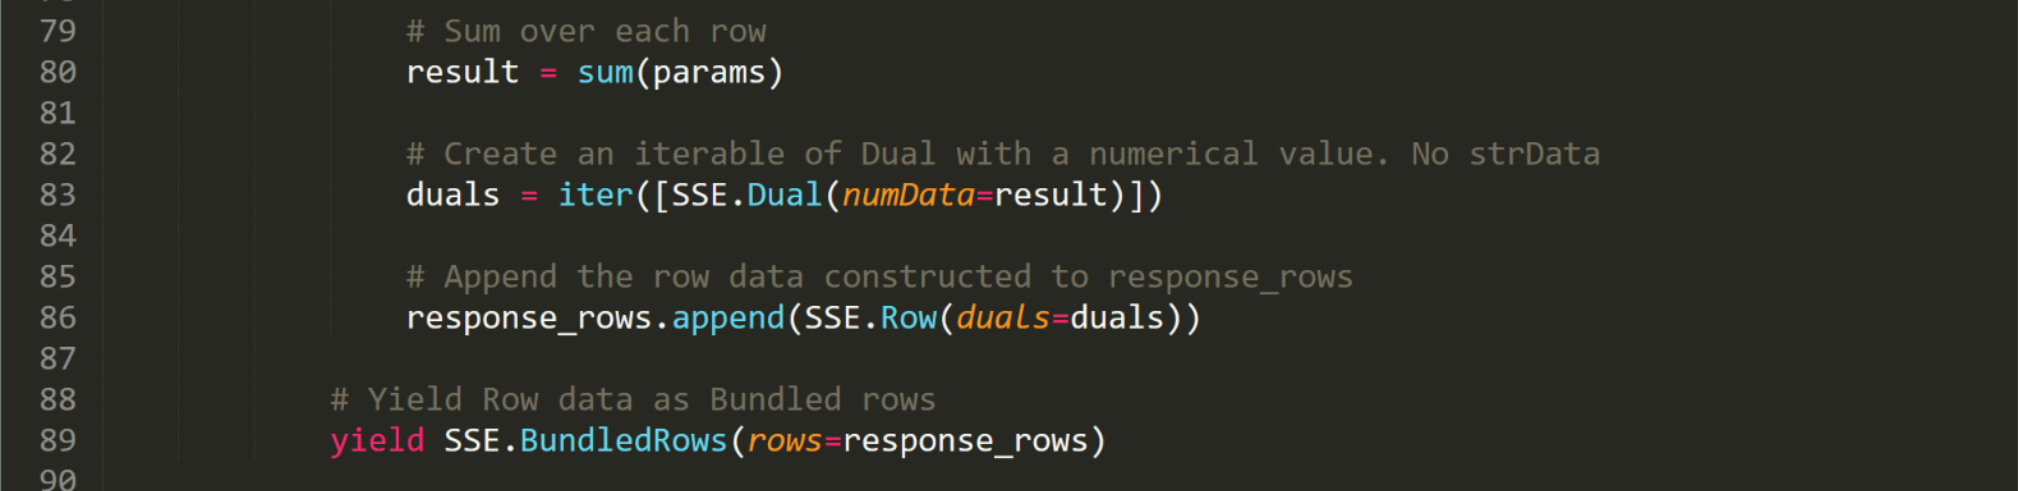
First the result is calculated – this is the sum of the elements (only two of them) in the params list. This represents the sum of elements in a single row passed from Qlik. Next the result is converted into an iterable with a numeric component (using numData). Next the dual values are converted into a Row and added to the list response_rows, which was initialized above to hold the response values. Finally, the rows are yielded (sent back to Qlik) as bundled rows.
Note: The data being saved as a dual (SSE.Dual) should match the ReturnType specified in the Functions Definitions JSON file, using one of the following syntaxes, depending on whether the ReturnType – that is the datatype expected by Qlik – is String, Numeric, or Dual.
dual = iter([SSE.Dual(strData= string_result)])
dual = iter([SSE.Dual(numData=numeric_result])
dual = iter([SSE.Dual(numData=numeric_result, strData= string_result)])
Next, store the value into a row.
row = SSE.Row(duals = dual)
Next, we want to append all the rows to be returned together into a single list. Note the order here must be consistent with the way the order was received from Qlik.
response_rows.append(row))
Finally, we yield a collection of bundled rows to be passed back to Qlik.
yield SSE.BundledRow(rows = response_rows)
Note: the functions supported by Qlik are tensor (one column of data returned) and aggregation (one value returned), you will never need more than a single Dual in a row for the data you are returning to Qlik. Additionally, if it is only a single value being returned (as in an aggregation), you will have one dual, in one row, collected as a bundle.
Running the Server Side Extension Plugin
To launch the SSE plugin, is a relatively simple process. All you need to do is navigate to the Toy Example directory from your command line. Then type:
python ExtensionService_column.py
This step needs to happen before Qlik Sense is launched. If everything is working correctly, you should see the following:

What this tells us is that the plugin is logging its activity and that it is running on port 50053.
Next, you’ll need to make sure the Column_Example.qvf file is located in your Documents/Qlik/Sense/Apps directory. Once it is, go ahead and launch Qlik Sense. After launching Qlik Sense, you should see the following lines added to your command window (and incidentally they will be in the log-file as well).

The Qlik Sense client will have just issued the GetCapabilities remote procedure call. In response, your SSE plugin just sent back to Qlik the metadata about your custom functions. Now if you open the Column_Example.qvf application, you will see the application is fully functional. It is returning the calculation results for the KPI boxes as well as for a column in the table. You could also use Column.SumOfColumn or Column.SumOfRows functions in any other application, so long as the parameters you pass to those functions are consistent with the function definition. Every time you interact with the Qlik application, you should see additional lines logged to the console telling you that the ExecuteFunction RPC call has been issued.
Conclusion
In this post, we continued our discussion of Qlik Sense Server Side Extensions with Python. I walked you through a very simple example SSE plugin that implements two custom functions. Along the way, we highlighted some of the most important parts of the code you will need to be familiar with if you want to create your own plugin. To combine and summarize everything. If you are looking to implement your own custom functions, all you need to alter is the following:
- Write your own Functions Definitions JSON file which outlines your functions’ metadata.
- Change the port on which to run your service from within the ExtensionService.py (line 230).
- Make sure to update your settings.ini file for Qlik Sense to register this new service on this port.
- Point to your JSON file from 1. from within the ExtensionService.py (line 232)
- Modify functions on lines 49-57 to map the function Ids from the JSON file to the function names within the ExtensionService.py
- Delete the existing functions (_sum_of_rows and _sum_of_column) and implement your own, using the same function names from 4.
- Launch your SSE plugin
- Start Qlik Sense
- Go call your functions from within a Qlik Application
Feel free to reuse as much of the code as possible. No need to reinvent the wheel here. I certainly did not. I’d like to give a major shout out to Tobias and his team at Qlik for writing the original version of this SSE plugin which I then modified.
In the next post, we’ll tackle a more nontrivial problem – one in which we solve a dynamic optimization by implementing a custom function in Python that solves an Integer Program. We’ll also discuss some of the limitations with the Server Side Extensions and some possible ways to cope with them.