


Why include a calendar table in your data model?
Organizing and analyzing data by time periods, such as weeks, months, or years is a common business analysis requirement. But this task cannot be completed without the inclusion of a calendar in the data model. Luckily, Microsoft Power Query offers a powerful solution.
Calendar tables
Creating a calendar table in Power Query can be a game-changer when it comes to organizing and analyzing data. By harnessing the power of dates and time periods, you can unlock deeper insights and improve your data-driven decision-making. You can effortlessly group data by weeks, months, or any other time frame you want. You can easily calculate metrics, analyze trends, and perform date-based filtering.
A calendar table is a table that contains a list of dates and additional columns that provide information about those dates, such as the day of the week, the week number, and the month name. By creating a calendar table in Power Query, you can easily join it with other tables, filter data by date, and calculate metrics by time period.
So, what are the benefits of creating a calendar table in Power Query? For starters, it can save you a lot of time and effort by automating the process of creating date-based calculations and visualizations. It can also help you gain a deeper understanding of your data and make more informed decisions based on actionable insights. Calendar tables can be used in a wide range of industries and applications, from sales and marketing to finance and operations.
Migrating from Qlik or Tableau to Power BI / Fabric?
Don’t start from scratch. Vortex automates up to 70% of the work—cutting costs, time, and risk.
See how Vortex can simplify your migration →
How to create a calendar in Power Query
Create the calendar table
To begin creating the calendar, you can open Power Query and select the 'Enter Data' option found within the Home tab. From there, a display will appear where a column can be initialized, and you can name the table.
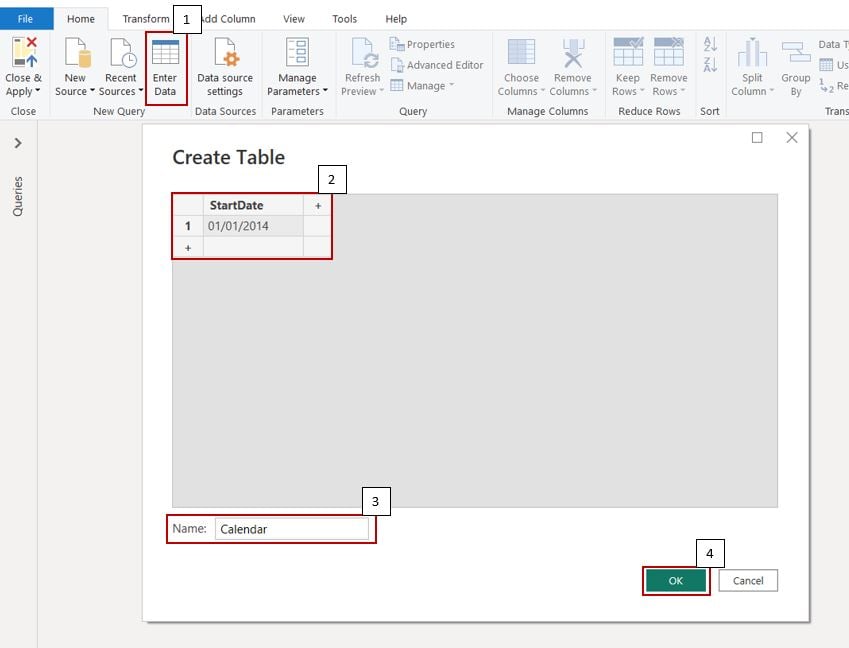
The date you are going to enter is the starting date of the calendar. The dataset used in this example only has sales transactions beginning in 2014, so we set the StartDate to 01/01/2014. Once the start date, column name and table name are entered, select 'OK'.
The next column to initialize is the end date of our calendar. We are going to add a custom column and name it 'EndDate'.
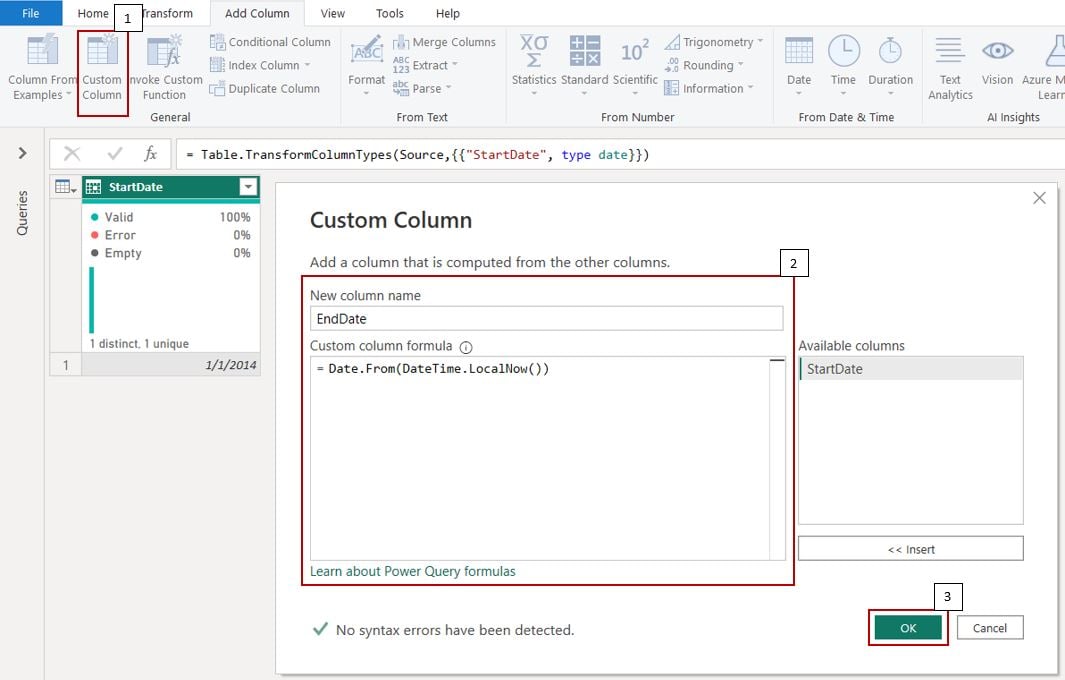
In order to make this value dynamic, we are going to use the following formula for the end date, so it will always be updated to the current calendar day:
= Date.From(DateTime.LocalNow())
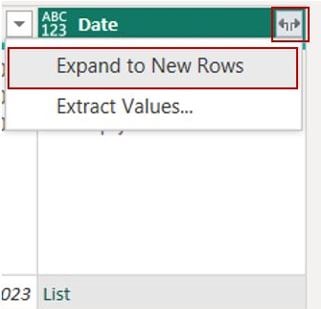
Next, we will have to create another custom column for all the dates between our start and end date values. This will serve as our date column for the calendar table—the base for creating calendar elements and creating a relationship to our data model. Use the following formula in the Custom Column formula bar:
{Number.From([StartDate])..Number.From([EndDate])}
This creates a list, which we will need to expand by clicking on the icon located in the top right of the column and selecting 'Expand to New Rows'.
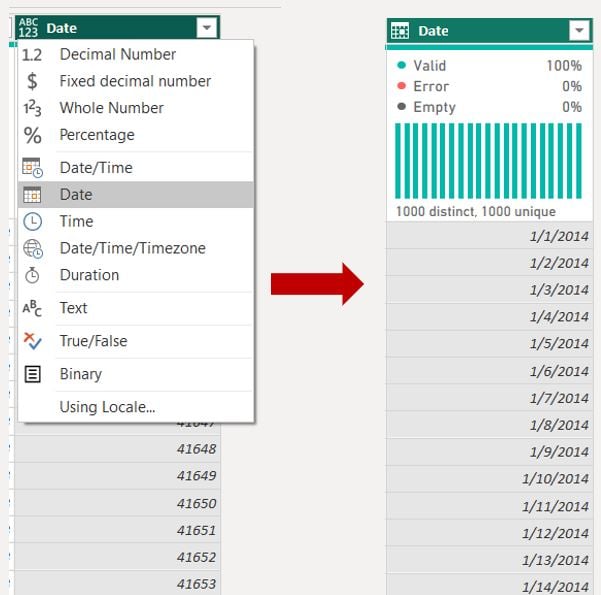
Once expanded, you'll see all the date values in a numeric format. We can simply change the Data type to 'Date' to get the proper formatting for our Date column.
Once the Date column has been expanded and the data type has been changed, the StartDate and EndDate columns can be removed, since they were only required to create the Date column.
Create the Calendar Columns
Now that the calendar table has been initially created and we have our Date range established, it's time to create our various calendar columns by combining M functions and our Date field.
Let's begin with the Year field. Select Custom Column, and once prompted with the Custom Column display, enter the column name (in this case, 'Year'), and the formula to create our new column.
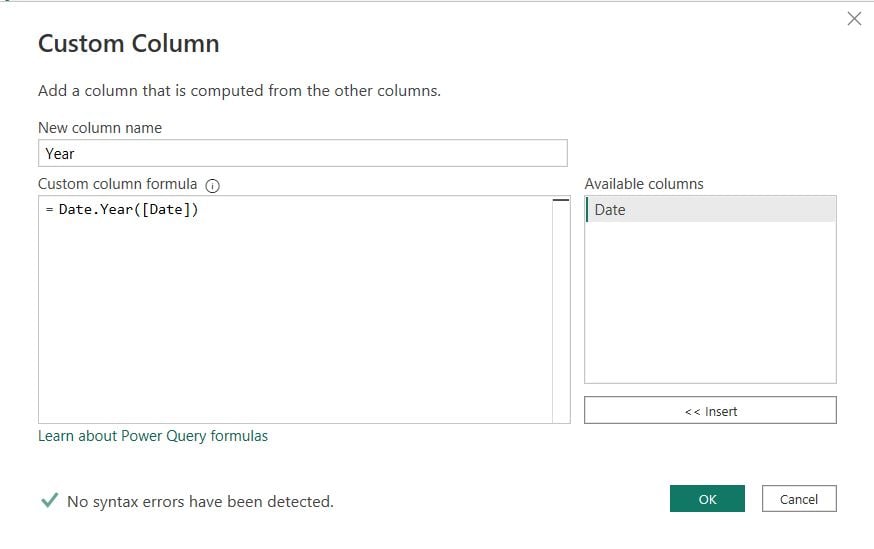
The formula used to create Year is below:
= Date.Year([Date])
Power Query has built-in date functions that are useful in creating our calendar columns. When creating elements such as Year, Month or Quarter, Power Query uses these functions to extract the specific values from a previously-created column.
We need to repeat this step for every calendar object you want to include in the calendar table. Below is a list of columns and the corresponding formulas to achieve the correct output. These functions are using the Date column we had originally created.
| Column | Formula | Example Output |
|---|---|---|
| Year | Date.Year([Date]) | 2014, 2015, 2016... |
| Month Number | Date.Month([Date])) | 1, 2, 3 .... 12 |
| Month Name (Full) | Date.MonthName([Date])) | January, February, March... December |
| Month Name (Short) | Date.ToText([Date], "MMM") | Jan, Feb, Mar... Dec |
| Quarter of Year | "Q" & Text.From(Date.QuarterOfYear([Date])) | Q1, Q2, Q3, Q4 |
| Week of Year | Date.WeekOfYear([Date]) | 1, 2, 3... 52 |
| Month | Number.ToText([Year]) &"-" & [Month Name (Short)] | 2014-Jan, 2014-Feb, 2014-Mar.... |
| Quarter | Number.ToText([Year]) & "-" & [Quarter of Year]) | 2014-Q1, 2014-Q2, 2014-Q3... |
| Week | Number.ToText([Year]) & "-W" & Number.ToText([Week of Year]) | 2014-W1, 2014-W2, 2014-W3... |
| Weekday | Text.Range(Date.DayOfWeekName([Date]), 0, 3) | Mon, Tue, Wed... Sun |
| Weekday Num | Date.DayOfWeek( [Date] ) | 1, 2, 3... 7 |
| Week Ending Date | Date.EndOfWeek([Date]) | 1/4/2014, 1/11/2014, 1/18/2014... |
| Day of Year | Date.DayOfYear([Date]) | 1 , 2, 3... 365 |
| Day of Quarter | Number.From([Date]) - Number.From(Date.StartOfQuarter([Date])) + 1 | 1, 2, 3... 91 |
| Day of Month | Date.Day([Date]) | 1, 2, 3... 31 |
| Quarter Index | [Year] * 4 + Number.RoundUp([Month Number] / 3) | 1, 2, 3... |
| Month Index | [Year] * 12 + Date.Month([Date]) | 8046, 8047, 8048... |
| Date Index | Number.From([Date]) | 24137, 24138, 24139... |
| DateKey | Date.ToText([Date], "YYYYMMDD") | 20140531, 20140601, 20140602... |
The list shows lots of columns that are useful to have in a calendar table. These include 'Day of ' fields and index fields that really help when creating time-based variables, and to help sort reports.
Special Case: Creating a Week Index
With just a few extra steps, you can create a very helpful week index in your calendar table. Since there are no built-in M functions that can easily create a week index, just follow the following steps:
- Duplicate the calendar table and rename to differentiate. (I.E. Week Index)
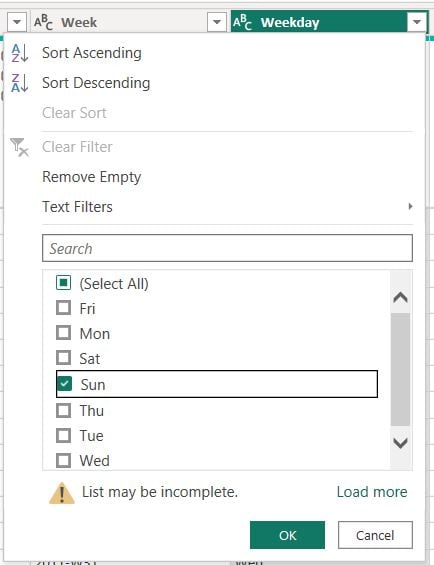
- In the new duplicated table, filter the Weekday column to 'Sun' values only.
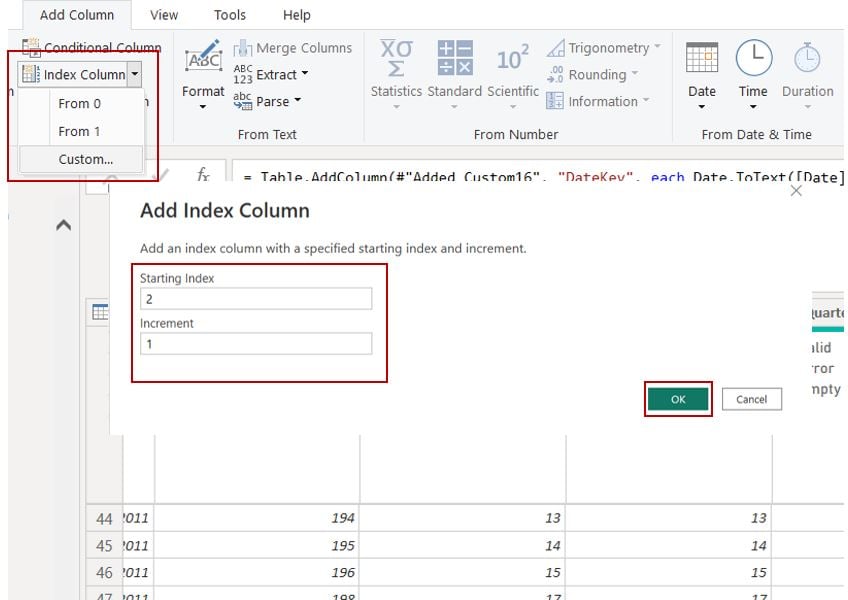
- In the duplicated table, add in a custom Index column with the starting index set to 2 and having an increment of 1's. Rename the column to Week Index.
- Merge queries, performing a left outer join between the original Calendar table and the duplicated filtered table. The join will be performed on the Week Ending Date field, joining the duplicated table onto the original Calendar table.
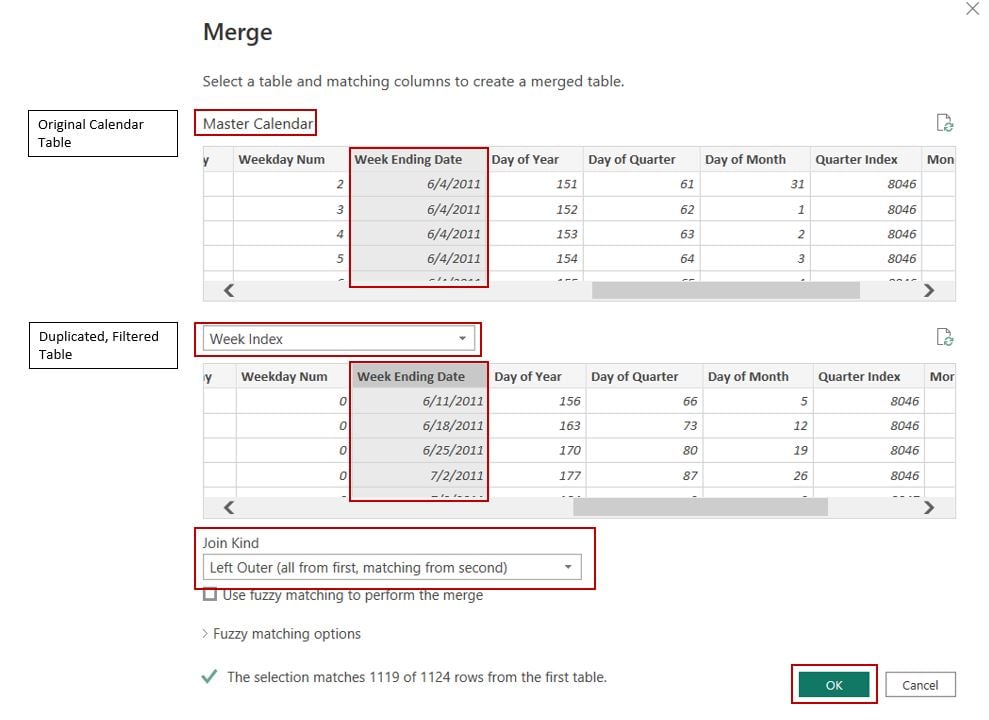
- Expand the joined columns and insert the Week Index column only.
- Replace null values in the Week Index column with a value of 1. This occurs because the first date we had established in our calendar table was not a Sunday, thus when we filtered our duplicated table, those dates prior to the first Sunday were not accounted for, giving them a null week index.
- Disable load on the duplicated table being that it is no longer needed.
Change the Data Types
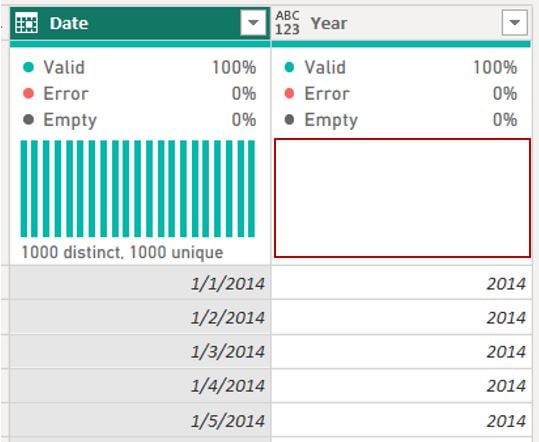
After the columns are added into the table, you'll notice one aspect missing in Power Query. When selecting Column Quality, Column Distribution and Column Profile in the View tab of Power Query, the only column that will have a Column Distribution displayed is our Date. That's because none of the columns created have the correct data types assigned.
Changing all of the data types last allows all of the changes to be put into one applied step as opposed to an individual step for each column's data type change. The proper data types for each column are listed below:
| Date Column | Data Type |
|---|---|
| Year | Whole Number |
| Month Number | Whole Number |
| Month Name (Full) | Text |
| Month Name (Short) | Text |
| Quarter of Year | Text |
| Week of Year | Text |
| Month | Text |
| Quarter | Text |
| Week | Text |
| Weekday | Text |
| Weekday Num | Whole Number |
| Week Ending Date | Date |
| Day of Year | Whole Number |
| Day of Quarter | Whole Number |
| Day of Month | Whole Number |
| Quarter Index | Whole Number |
| Month Index | Whole Number |
| Week Index | Whole Number |
| Date Index | Whole Number |
| DateKey | Whole Number |
Once all of the proper data types are assigned to the individual columns, the Column Distribution will be displayed, and the Calendar Table is complete.
Time's up!
Calendar tables not only save you time, but also empower you to make more informed choices. Adding a calendar table in Power Query is a smart move that will enhance your data organization and analysis capabilities.