

A few weeks ago, we recorded a video Podcast episode on which we discussed the integration of Qlik Sense and Python to deliver a marketing resource optimization solution (you can check it out here). Since then, I’ve decided to write a few posts that will describe the “Advanced Analytics Integration (AAI)” in Qlik – with a more specific focus on Server Side Extensions (SSE) written in Python. This post will focus only on the support for custom functions callable from the Qlik Sense front-end. It will not incorporate the support for Python scripting within the Sense Front-end or from the load script. This is because I find the former use case far more compelling than the latter. These posts will assume that you have at least a basic working knowledge of both Qlik Sense and Python. I’m going to try to walk through this step by step so that you can follow along, but I have also uploaded all the files I will use to a git repo.
I have decided to split this out into a three-part post as follows:
- Part 1: Technical overview of some moving parts. Configuring your environments.
- Part 2: Technical discussion of a Sample Plugin, highlighting important parts of the code and how to change them if you want to write your own plugin.
- Part 3: Solution of a real optimization problem using Qlik and Python.
Overview
First off, what is Advanced Analytics Integration (AAI) in Qlik Sense? And how is it different from Server Side Extensions (SSE)? You may hear both acronyms tossed around, and they are very closely related. Advanced Analytics Integration is a concept that Qlik is fervently embracing – essentially aimed at allowing Qlik to play nicely with other useful analytics tools. Server Side Extensions support the Advanced Analytics Integration concept by exposing data from within a Qlik data model to an external scripting/programming language through remote procedure calls (RPCs). Essentially each SSE plugin is its own Micro-service that communicates with Qlik. What this means in simple terms is that a user can select data in the Qlik Front-end which is then passed outside of Qlik evaluated in an external language (like Python) and then the results are returned to the Qlik front end. The real power here lies in the fact that you can now do much more advanced analysis from the Qlik front end than would be infeasible to achieve using native Qlik functionality.
How Server Side Extensions Work
High level Architecture
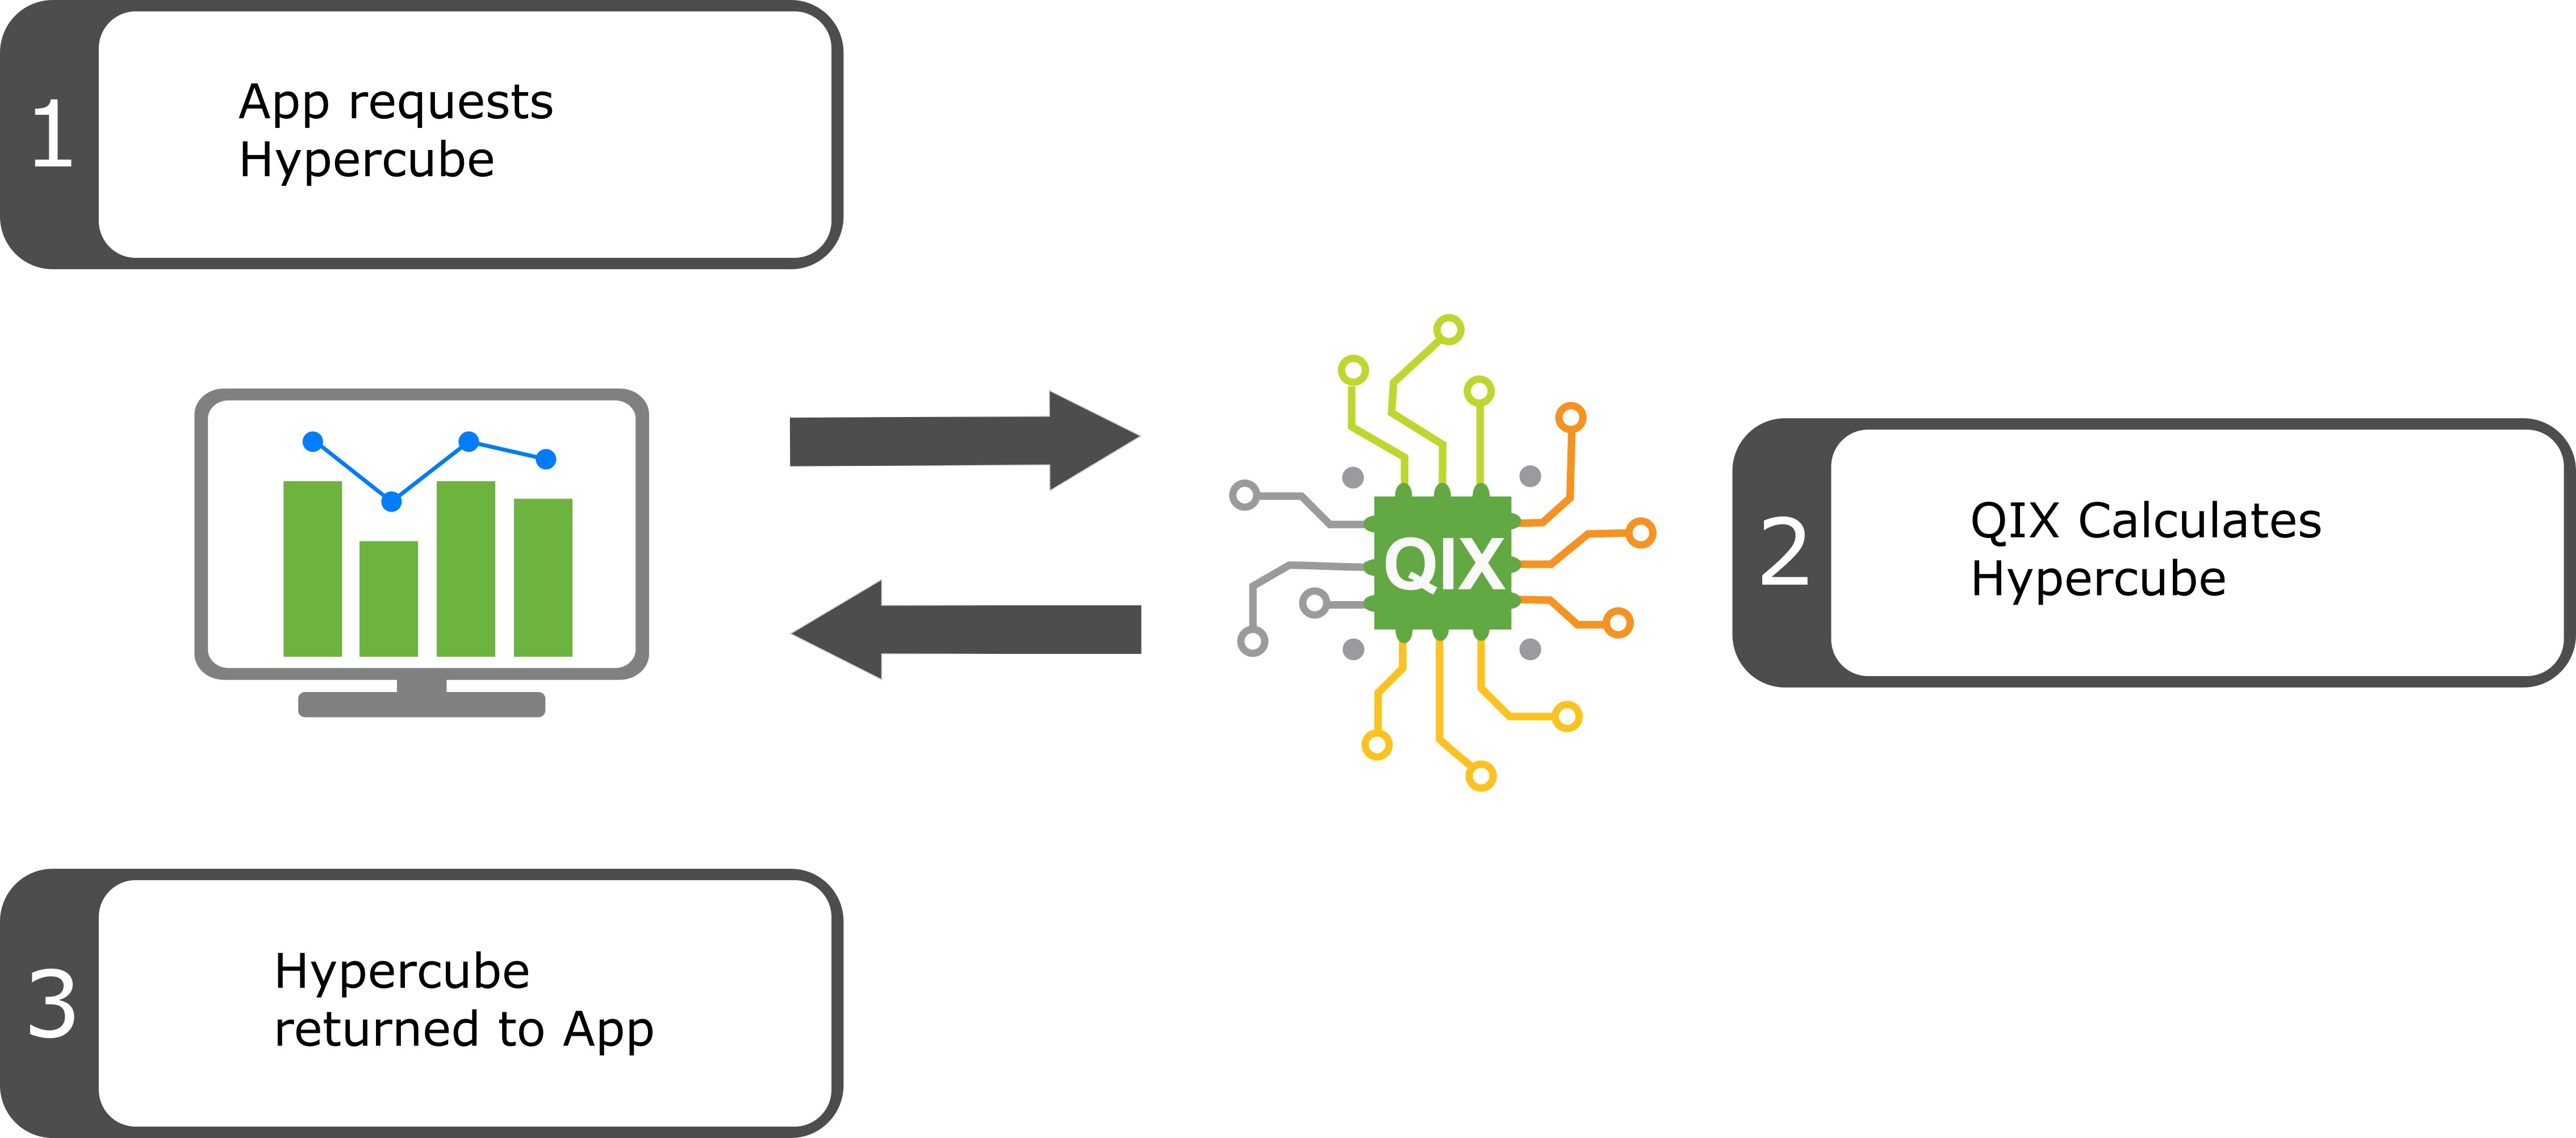
Before we dive into the nuts and bolts of an SSE plugin (next post), it’s probably worth taking a few sentences to highlight the basic architecture of Qlik Sense and how it is different when using Server Side Extensions. Specifically, we’ll focus on what happens when users interact with a front-end Qlik Sense client. Each chart/object in the front-end is rendered from a specific hypercube of data from the data model. This hypercube is essentially just the collection of relevant dimensions and measures that are required by that object. Each time a selection is made in the front-end, the Qlik Sense client sends a request for an updated hypercube of data. The QIX Engine is responsible for calculating the hypercube and sending the data to the front-end for rendering. This is shown schematically below.
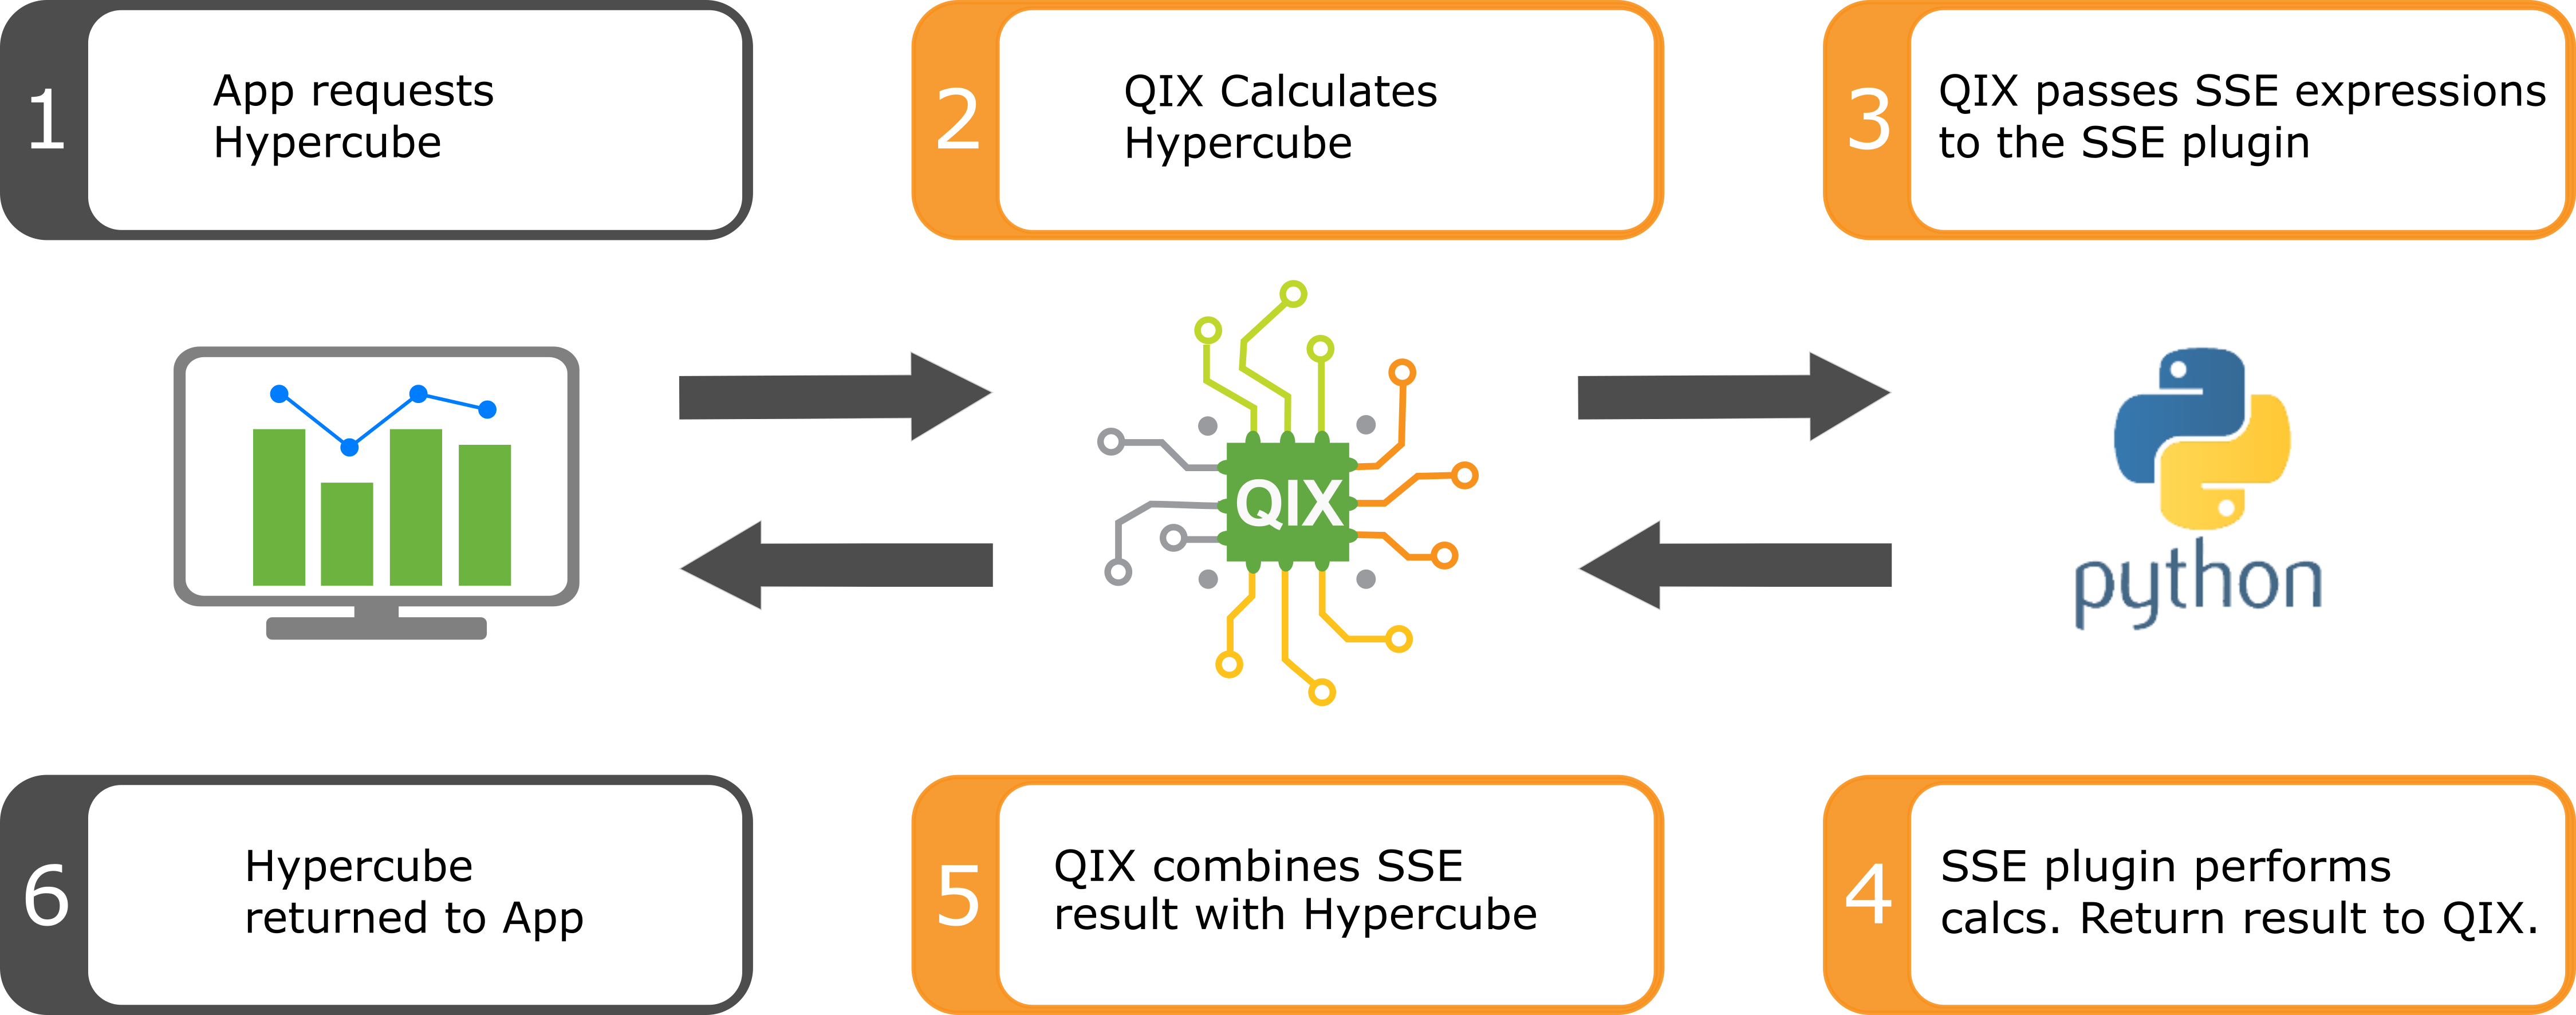
This differs when using the Server Side Extensions in a few important ways. If a chart or object contains a custom SSE function in it, when it requests the hypercube from the QIX engine, the engine will only calculate what it can using native Qlik functions (sum, max, aggr, etc). If it recognizes a custom SSE function, the QIX engine will pass the associated data to the SSE plugin and request that the plugin evaluate the custom function (through a remote procedure call). The plugin will perform its calculations, and then return the result to the QIX engine. The engine will then combine the plugin result with the calculations it performed and return the resulting combined hypercube to the front-end for rendering. The architecture is shown in the image below.
Data Serialization/Deserialization
One other critical aspect that I would like to point out is how data is passed back and forth between QIX and the SSE plugins. This is accomplished using something called Protocol Buffers. Protocol Buffers are a way to serialize structured data that can be used to allow programs to communicate with each other. Protocol Buffers were developed by Google to be faster and more light-weight than XML or JSON to facilitate network communications between microservices. The structure of the data is defined once (in the protocol buffer language), and then compiled into one of multiple supported languages to automatically generate the data access classes for that language. This makes it super easy to share data between programs written in different languages – exactly what SSEs are meant to do. One drawback, however, is that this means Qlik’s SSE only works with programming languages for which there exists a Protocol Buffers Compiler. Fortunately for us, Python is supported. If you are interested in R, however, such a compiler does not yet exist. R can be used in Qlik Sense, but it requires a C# SSE plugin and is not a particularly elegant solution – though it does work if you really need to run R.
Now that we have the architecture out of the way, let’s configure our environment – don’t worry, it will only take a few minutes.
Setup Qlik Sense
Support for Server Side Extensions was a new feature in Qlik Sense June-2017. If you plan to follow along, you’ll need to download this version of Sense (or later if it is available). You can download it from here , but you’ll need to create a free Qlik account if you don’t have one in order to be able to download. Also, save your credentials, because you will need them each time you use Sense. When your account is setup, go ahead and install Qlik Sense Desktop using the default settings. There is only one minor change that you will need to make to enable SSE to work. In the Documents/Qlik/Sense directory you will need to edit the Settings.ini file (using the text editor of your choice). Add the following line at the end of the Settings file.
This settings file will tell Qlik Sense that you have two SSE plugins (we don’t have them yet, but we will look at them in the next two blog posts). This is nothing but a semicolon separated lists of the plugins you want Sense to have access to. You can add additional plugins as follows.
The alias can be anything you want it to be but it is best to give it a name that has some relevance to the functions that are defined within the plugin. Eventually to call the custom function from within Sense front-end you will need to use the following format:
For example the Column plugin has a function called SumOfColumn, which sums all the values in a column of data. It is called from the Sense Front-end using:
After altering the settings.ini file, we are done with Sense.
Setup Python Environment
Next, we’ll setup your Python Environment. Qlik’s SSE support for Python requires Python version 3.4 or greater. If you do not have Python on your machine already, I highly recommend the Anaconda distribution. It comes pre-packaged with a whole bunch of useful packages, a nice IDE (Spyder) and some tools that are useful for managing packages and virtual environments. The only other thing is required is the grpcio package. It is the package that facilitates the bidirectional streaming of protocol buffers between Qlik Sense and Python. You can install it with pip, the python package management system, with the following command:
That’s it. That’s all the we need to run an SSE plugin. However, if you want to implement any functions in Python that require other packages you’ll need to install those as well.
Summary
This post was the first of a three part series. It summarized some of the important features about the architecture of Qlik’s Advanced Analytics Integration. Then we summarized the (minimal) setup required to configure a Qlik Sense/Python environment to support the deployment of a custom SSE plugin. In the next post I’ll introduce a simple plugin, walk through some of the technical portions of the code, and show you what are the important parts to change if you want to implement your own solution in the future.